Look at that handsome guy! For my birthday back in November, I got a set of round knitting looms. These videos are great for learning how to use the round loom and make a standard hat. However, Matt wanted a slouchy beanie. I could not find anything online on how to make one, so I created my own. If you have a round knitting loom, here is a tutorial on how to make one that is super easy and only takes about an hour to make. I used super soft yarn for the gray one Matt is wearing and regular worsted yarn for the yellow one, but the softer yarn worked a lot better. It had more flexibility and was not as stiff. I have not tried bulky yarn yet, but I plan to. I’ll update this post to let you know how it goes!
What You Need
- 1 Skein of medium-weight yarn (I used Simply Soft)
- Largest round knitting loom (11″)
- Knitting loom hook and needle
- Crochet hook the size as indicated on your yarn package (mine called for 5mm)
- Scissors
Steps to Knit on the Loom
1. Using the largest round loom, make a slip knot around the peg on the outer edge of the loom.
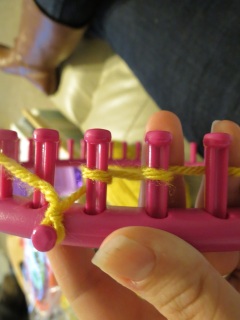
2. Wrap the yarn clockwise around each peg—not too tight but tight enough that they do not come lose from around the pegs.
3. Since this yarn is thinner and you do not want big holes or gaps, we’re doubling the yarn to make it thicker. Wrap the yarn all the way around the loom four times, then wrap the yarn around the outer peg a few times to secure.
4. Insert the hook underneath the bottom row (bottom two pieces) of the peg.
5. Pull the bottom row over the peg with the hook while leaving the top row on the peg. I usually do the pegs to the left and right of the outer peg first just in case the yarn slips off the outer peg.
6. Continue to hook the yarn over the peg all the way around the loom until only the top row is left on each peg.
7. Push the yarn down to the bottom of the pegs.
8. Wrap the yarn around each peg all the way around the loom two more times to create another row.
9. Repeat steps 4-7 until you have completed 30 rows. (After a row or two, remove the slip knot from around the outer peg.)
10. Make sure this seems like a decent length of hat for you (we’ll add a couple more rows for a brim). Feel free to add more if you would like.
11. Once you are done, cut the yarn leaving a few inches of tail. Then, cut a piece of yarn longer than the loom is wide.
12. Thread the piece of yarn through the needle.
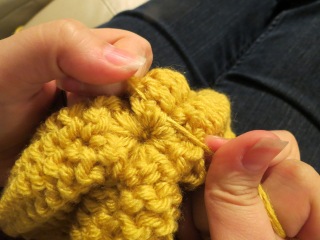
13. Starting with the peg to the right of the outer peg, insert the needle from the bottom of the beg under the yarn.
14. Once you pull the needle through, pull the yarn off the peg.
15. Continue this all the way around the loom.
16. Once you have freed the yarn from the loom, turn the hat inside out and cinch the top of the hat by pulling the two ends of your piece of yarn together.
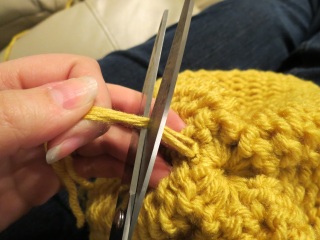
18. When the yarn is sufficiently secure, cut the ends off leaving about an inch.
Steps to Crochet the Brim
1. Turn the hat right side out. Find the tail that you had around the outer peg when you originally started knitting. Tie the end of the yarn from your skein to the tail as close to the hat as possible. Make sure it is very secure, and then cut the free ends off so there is just a little knot left.
2. Make a slipknot around the crochet hook.
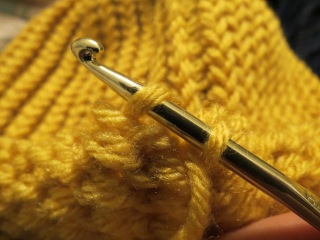
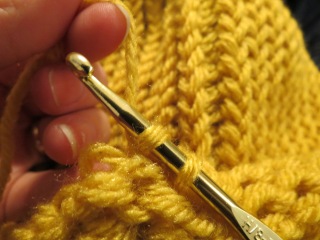
3. Now we are going to do a single crochet around the edge of the hat to make a brim and pull the edge tighter to fit around a head. Loop the hook into the loops on the outermost edge of the hat.
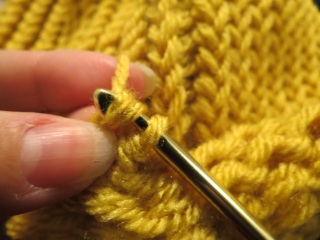
4. Wrap your yarn around the end and pull it through the middle loop. Now there are two loops on your hook.
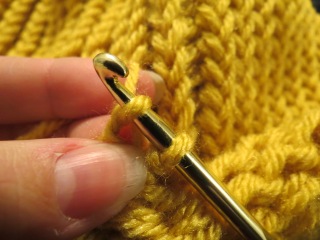
5. Wrap your yarn around the end of the hook again and pull it through both loops leaving only the loop you pulled through on your hook.
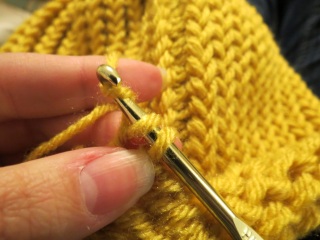
6. Insert the hook into the next outer loop on the hat and repeat steps 4 and 5. Continue this all the way around the loom two or three times depending how thick you want the brim.
7. When you are done, cut off the yarn leaving a few inches.
8. Now do a slip knot by inserting the hook into the next loop, wrap the yarn around the end of the hook, and pull it through both loops. Pull the knot super tight.
9. Repeat step 8 one or two more times, and then cut the excess yarn off.
Now you have a great hat that is warm and fashionable! If you would like to buy a hat like this from me, let me know, and I will gladly get one to you.
XO,
Mad
P.S. If you have never crocheted before and you completed this hat, you just learned how to do a single crochet stitch and a slip knot!









This is exactly what I was looking for. Thank you so much for this tutorial. I have a question. You state to use the largest loom,well the standard one I use for adult hats has 36 pegs and my extra large has 42 pegs which one should I use
LikeLike
I am having trouble getting my loops over the top of the peg. It is difficult and too tight. How can I loosen my loops? Thanks
LikeLike
Unfortunately, you can’t loosen your loops without undoing it all. Wrap the yarn around the peg more loosely, which will give more room to pull it over the top of the peg.
LikeLike
I am glad! My largest loom has 41 pegs, so use your extra large one with 42.
LikeLike
thank you 🙂
LikeLike
If anyone making this hat uses a standard adult loom (36 pegs), as I did, I strongly suggest that you skip the crochet part because I did it and had to undo it afterwards as the hat did not fit my head anymore.
LikeLike
Thanks for your comment. The purpose of the crocheted part is to keep the ends from curling up. My pattern uses the extra large loom which is why you also need the crochet portion to pull it back in to fit one's head.
LikeLike
use the one with 42 pegs, it will come out more slouchy and less like a regular winter hat.
LikeLike
It looks like there's a different section on the band at the bottom of the beanie. Is that a different set of several rows of stitches?
G
LikeLike
Hi Graham,
Thank you for your comment! Yes, the bottom band is crocheted instead of knitted on the loom. There are steps provided in the tutorial for crocheting that portion. Let me know if you have any questions!
XO,
Mad
LikeLike
About how long does this take?
LikeLike
Hi Dustin! Great question. I'd say it takes me about an hour and a half to two hours, but it depends on how quickly you knit and crochet.
LikeLike
Hi and thanks so much for this! I used the green loom as the hat sizes come out perfect for most adults. My question is, do you think I could use your method making it a bit loose and still have it work? My son didn't want the normal brim and now the beanie is rolling up on the ends. ugh! Thanks so much! Tonya
LikeLike
In other words, do you think it would be too tight since I used the green loom. Sorry, just want to make sure I'm not confusing you as much as I'm confusing myself lol Thanks again! Tonya
LikeLike
I am going to try this on my newest loom, the purple adult hat loom. Is there a written pattern I could download or print? Thanks for the pictorial version tho.
LikeLike
How many rows did you do for the brim
LikeLike
Love, love, love this pattern! Thank you so much!
LikeLike
Great project! I made my first beanie but it was too small for my husbands dreads so this became my sons hat. But, how many rows do you suggest I make for my husband (his dreads are mid way down his back)?
LikeLike
Will a 40 peg loom work for this?
LikeLike
I'm glad! I'm a big fan myself and have now made a dozen or more. 🙂 Thanks for your comment!
LikeLike
Tonya, I apologize profusely for not responding to your comment sooner. I have different color looms, so I'm not sure what size your green one is. I used one size bigger than the regular adult size to make it loose. You can still crochet the brim though to keep it from rolling up. I've done that on several non-slouchy versions.
LikeLike
In order to make it slouchy, I recommend using the size bigger than the average adult size and then using the crochet method to cinch the brim to be tight around the head. I do not have a downloadable or printable pattern, I'm sorry.
LikeLike
I think a 40 peg loom would work perfectly. The loom I used had 41 pegs.
LikeLike
I usually do two or three rows for the brim, but I've done more. It depends on what look you want.
LikeLike
Hi Stasha! Hmm…I'm not sure. The regular one is 30 rows, so I'd say to have him put the loom on his head after you've done 40 rows or so to see if it's about the right length that you want and then adjust accordingly.
LikeLike
Can you please put up a video to show how to finish the hat? I am having a hard time with the crocheting.
LikeLike
Hi Hank! Sorry I missed this comment. I don't know that I could create a very good video, but it's just a single crochet stitch. This is a pretty good tutorial video on single crochet stitch: http://www.youtube.com/watch?v=OqhaQQajt0U.
LikeLike
Thank you for this article and the pics that helped with the explanation. Searched a number of sites and was left more confused. Keep up the great job!!!
LikeLike
You're welcome Marilyn! I'm glad it was helpful.
LikeLike
How long does the yarn need to be? And is it ok to use any type of yarn?
LikeLike
It takes a bit more than half a skein of yarn. Yes, you can use any kind, but I recommend a medium thickness. If you use thin yarn, I would suggest doubling it. Too thick of yarn will make the hat stiff, and it won't slouch as much.
LikeLike